Dear fermentation friends,
We Germans love sauerkraut! And this is well known all over the world. But how amazing would it be, if you could make your own selfmade sauerkraut at home?
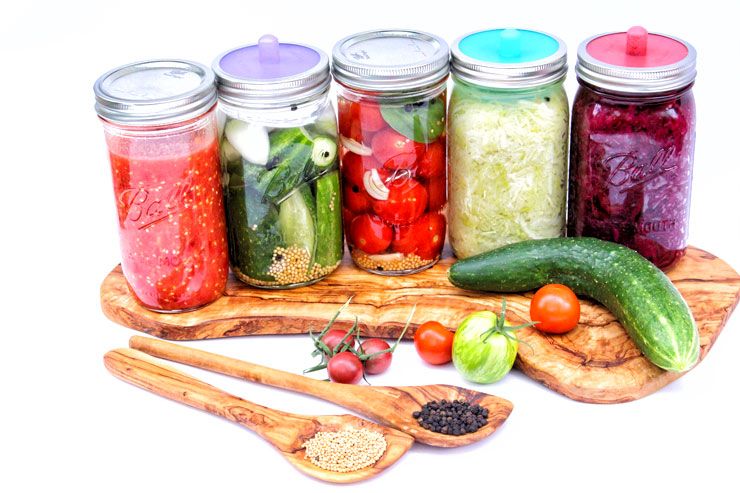 all you need for fermenting you can easily order here*
Fermenting is very easy and tasty. Fresh, self-fermented sauerkraut with a crispy bratwurst is one of the favourite dishes of all Germans. Try it yourself!
For this easy fermented sauerkraut recipe you need those ingredients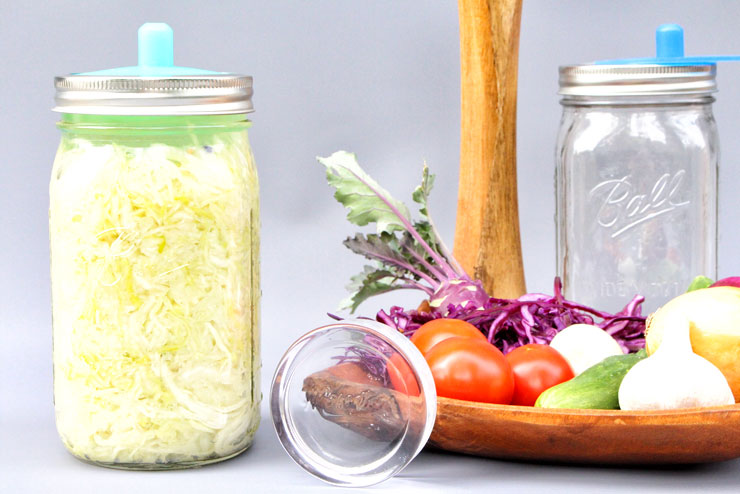
- 1kg white cabbage or pointed cabbage (1 – 2 cabbage heads)
- Per kg 1.5 – 2 % salt (best rock salt such as Himalayasalz)*
- 1 teaspoon of caraway seeds (carnival or juniper berries are also possible according to taste)
What equipment do you need for your home made sauerkraut?
- 1 bowl*
- 1 cutting board*
- 1 fermentation vessel* (700ml glass with lid* with fermenting attachment* and glass weight*-You can easily buy our special fermenters and accessories here*)
- 1 symptom weight*
- 1 fermentation attachment* / alternative: fermentation attachment*
- 1 wooden stamping*
- 1 vegetable slicer*
- 1 sharp knife*
- Kitchen scale*
Do you have everything? This is how to make your selfmade sauerkraut!
- In the first step you remove all the unsightly leaves of the cabbage heads. Afterwards you remove 1 – 3 more beautiful, fresh leaves and keep them. In the further course of the sauerkraut production we will still need it.
- Now you halve the cabbage and cut everything into thin, small stripes. On the one hand, this is very good with a sharp knife. A vegetable slicer is even more practical at this point.
- As soon as the cabbage is cut, you weigh it and calculate the required amount of salt. Note: For 1 kg of cabbage you need 15 – 20g salt.
- Now you put salt, spices and chopped cabbage in a bowl and knead everything vigorously. When kneading, the cells of the cabbage open and there is a lot of white cabbage juice. This mixes with salt and spices. This creates our salt lake, which you need for fermentation. In addition, the cabbage strips become nice and soft through the kneading.
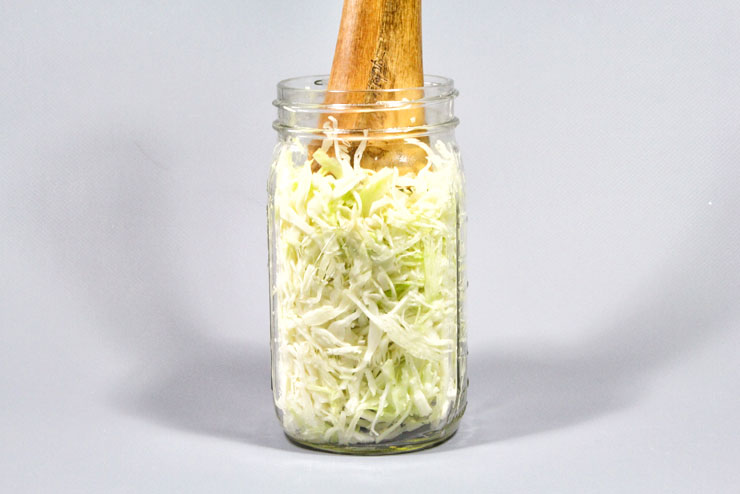
Tip: You can also mix everything and let the mixture rest for about 3 hours or even overnight. Then the salt does some work for you and kneading or massaging from the cabbage is easier later. If you want to keep the bowl with the cabbage and spice salt mixture in the refrigerator for this period, kneading may be a bit uncomfortable because the herb is very cold and your hands become stiff. At least our office and kitchen hands cannot do it so well. If you are a little harder and laid paving stones in winter with a mere hand or something similar, it will probably not make it so much 😉 Better store at room temperature and cover well so that small flies or other insects do not affect the future sauerkraut. - As soon as there is enough saltlake, you can put the salted and seasoned cabbage strips in the fermentation glasses. You notice whether there is enough liquid from the fact that the salt lake almost covered the cabbage. At this point, the wooden stamping horse comes into play. Each portion of cabbage that ends up in the fermentation vessel you press the wooden stamped down so that the liquid (salt lake) rises. In this way, the air still existing in the cabbage-salt-seasoned air can escape upwards. Fill the fermentation vessel so far up to at least 4 cm space.
Important: prefer to make a little less cabbage in your glass than too much. Many tend to make the glass full as possible. (We also felt that at the beginning of our fermentation trip ;-)) But that can or will lead to more work for you in the course of fermentation. As soon as the fermentation starts, gases develop. This increases the volume and the liquid in the glass increases. In the case of fermentation vessels with a fermentation attachment, the liquid then comes from the valve and there is a mess. Later when the air has escaped, the liquid is missing again and you have to fill up. You notice, sometimes less is more 😉 - Now you fold the good cabbage leaves of point 1, cover the content of the fermentation glass and complain with a weight. Glass of symptoms are very practical at this point and have many advantages. Do it so that the cabbage is completely in your own juice. If something is still missing, you can use the liquid remaining in the bowl to fill up.
- Now clean the glass nicely, dry it and fix the fermentation closure on the glass with the help of the screw cap. You now store this glass for 1 week at room temperature. Then have for at least 2 – 4 weeks in the cool basement, storage room or even refrigerator. Fermentation at lower temperature is intended to prevent the sauerkraut from becoming too acidic. After the homemade sauerkraut was allowed to ferment for a total of 3 weeks, you can try whether the taste is good. If you can be patient for so long, you should have the sauerkraut fermented for a total of 8 weeks. Then from our point of view it is perfect. If it tastes, the fermentation process is complete and you can enjoy the delicious herb. If it is not yet mouthed, lid on it again and let them ferment. Once opened, your self -made sauerkraut is kept stored for several months.Tip: In general, it results in fermentation, whether kefir, kombucha, sourdough, miso or sauerkraut sense to label fermentation vessels. Simply note the current date and the corresponding content on glass. Especially if you start and still have to test the fermentation, this is very helpful.
- Now, enjoy your homemade sauerkraut! We wish you a lot of fun with fermenting
selfmade sauerkraut
Print RecipeIngredients
- 1kg white cabbage or pointed cabbage (1 – 2 cabbage heads)
- Per kg 1.5 – 2 % salt (best rock salt such as Himalayasalt)
- 1 teaspoon of caraway seeds (carnival or juniper berries are also possible according to taste)
Instructions
In the first step you remove all the unsightly leaves of the cabbage heads. Afterwards you remove 1 – 3 more beautiful, fresh leaves and keep them. In the further course of the sauerkraut production we will still need it.
Now you halve the cabbage and cut everything into thin, small stripes. On the one hand, this is very good with a sharp knife. A vegetable slicer is even more practical at this point.
As soon as the cabbage is cut, you weigh it and calculate the required amount of salt. Note: For 1 kg of cabbage you need 15 – 20g salt.
Now you put salt, spices and chopped cabbage in a bowl and knead everything vigorously. When kneading, the cells of the cabbage open and there is a lot of white cabbage juice. This mixes with salt and spices. This creates our salt lake, which you need for fermentation. In addition, the cabbage strips become nice and soft through the kneading. Tip: You can also mix everything and let the mixture rest for about 3 hours or even overnight. Then the salt does some work for you and kneading or massaging from the cabbage is easier later. If you want to keep the bowl with the cabbage and spice salt mixture in the refrigerator for this period, kneading may be a bit uncomfortable because the herb is very cold and your hands become stiff. At least our office and kitchen hands cannot do it so well. If you are a little harder and laid paving stones in winter with a mere hand or something similar, it will probably not make it so much 😉 Better store at room temperature and cover well so that small flies or other insects do not affect the future sauerkraut.
As soon as there is enough saltlake, you can put the salted and seasoned cabbage strips in the fermentation glasses. You notice whether there is enough liquid from the fact that the salt lake almost covered the cabbage. At this point, the wooden stamping horse comes into play. Each portion of cabbage that ends up in the fermentation vessel you press the wooden stamped down so that the liquid (salt lake) rises. In this way, the air still existing in the cabbage-salt-seasoned air can escape upwards. Fill the fermentation vessel so far up to at least 4 cm space. Important: prefer to make a little less cabbage in your glass than too much. Many tend to make the glass full as possible. (We also felt that at the beginning of our fermentation trip ;-)) But that can or will lead to more work for you in the course of fermentation. As soon as the fermentation starts, gases develop. This increases the volume and the liquid in the glass increases. In the case of fermentation vessels with a fermentation attachment, the liquid then comes from the valve and there is a mess. Later when the air has escaped, the liquid is missing again and you have to fill up. You notice, sometimes less is more 😉
ow you fold the good cabbage leaves of point 1, cover the content of the fermentation glass and complain with a weight. Glass of symptoms are very practical at this point and have many advantages. Do it so that the cabbage is completely in your own juice. If something is still missing, you can use the liquid remaining in the bowl to fill up.
Now clean the glass nicely, dry it and fix the fermentation closure on the glass with the help of the screw cap. You now store this glass for 1 week at room temperature. Then have for at least 2 – 4 weeks in the cool basement, storage room or even refrigerator. Fermentation at lower temperature is intended to prevent the sauerkraut from becoming too acidic. After the homemade sauerkraut was allowed to ferment for a total of 3 weeks, you can try whether the taste is good. If you can be patient for so long, you should have the sauerkraut fermented for a total of 8 weeks. Then from our point of view it is perfect. If it tastes, the fermentation process is complete and you can enjoy the delicious herb. If it is not yet mouthed, lid on it again and let them ferment. Once opened, your self -made sauerkraut is kept stored for several months. Tip: In general, it results in fermentation, whether kefir, kombucha, sourdough, miso or sauerkraut sense to label fermentation vessels. Simply note the current date and the corresponding content on glass. Especially if you start and still have to test the fermentation, this is very helpful.
Now, enjoy your homemade sauerkraut!
Have fun and enjoy!
I wish you a lot of fun by making this fermented sauerkraut recipe and I am very excited to hear your opinions about this delicious recipe.
I would love to see some comments about your favourite fermented recipes and how you liked mine.
I am looking forward to see you again for my next recipes.
Petra
Watch also this video and many more regarding Kefir and Kombucha on my Youtube channel…
* This is an Affiliate-Link – Affiliate-Links are sponsored Links
2 Comments
Andrea Vu
Friday June 5th, 2020 at 12:08 PMHallo! Bei mir ist der Sauerkraut sehr salzig geworden, woran liegt das? Habe mich sehr genau an die Mengenabgabe gehalten 🙁
Danke,
LG Andrea
Petra
Friday June 5th, 2020 at 12:39 PMLiebe Andrea,
vielen Dank für Ihren freundlichen Kommentar.
Grundsätzlich ist es ja sehr unterschiedlich wie Menschen den Salzgehalt empfinden. Wenn Sie viel Rohkost essen ist bei diesem Rezept vielleicht etwas zu viel Salz enthalten. An dieser Stelle ist das Rezept im Prinzip lediglich eine Empfehlung und Sie können für das nächsten Mal einfach die Salzmenge reduzieren und schauen wie es Ihnen damit schmeckt:-)
Viel Spaß weiterhin beim Fermentieren!
Liebe Grüße
Petra & Stephan Kriegener